Friday, May 18, 2012

A Hiatus

Regrettably, I am going to have to take a brief hiatus from blogging/sewing. My wife has just been diagnosed with preeclampsia (I can't believe that I just spelled that right on my first try!) and put onto bed rest until the pregnancy ends. It's possible that I'll get a few moments to break away and get some work done, but not too likely :(

On the flip side, the garden is going pretty well (as long as I can keep the vine borers at bay). Check out this zucchini that I picked the other day:

I promise to keep everyone up-to-date as the pregnancy progresses. In the next month or so expect a sudden upload of disgustingly cute baby pictures. I'll still be checking comments so feel free to drop me some love/encouragement/threats.

Until next time,
Kyle

Friday, April 13, 2012

Where I create a good fitting, but unwearable, shirt (part II)

This post is part II in a series. To get caught up to speed, check out part I here.


Awww shit, look at that crease! Note how the yoke rolls down onto my arm. Clearly the shoulder fit to too big. Except, when I compared the shoulders of this shirt to my well fitting white shirt, the rear yokes measure exactly the same. So I measured the front yokes from collar to sleeve:


And found that the blue shirt was 2cm wider along the front yoke edge. I don't know why they drafted this odd of a arm scythe, but I was going to have to fix it. Time to remove the sleeves and recut the yokes.


It was at this point that I realized total sleeve removal was going to be a no-go. When adjusting the side seams I chose to half-ass things and sewed the arm hole bottoms shut. Since I didn't intend to wear this shirt out anywhere it wasn't a big deal to just half-remove the sleeves. If you are doing this invasive of a procedure on a shirt you want to wear, I'd bring in the sides last (or just do things right the first time).


I measured in 16mm (the front yoke size on taken from the white shirt) and marked my new yoke width.


and then drew my new arm scythe using the french curve that I've borrowed from Crissy (I'm giving it back soon, I promise). I'm a firm believe in over-using pins, and also of pin-basting, so this was the sleeve before I sewed it:


While I was working with the sleeve, I went ahead and removed a 2" wedge (from armpit to cuff) in an attempt to reduce bagginess in that area. I think I may have pinned poorly, because it gave the sleeve an odd wrinkle. This is was the fit afterwards:


And an obligatory before:middle:after shot:


All in all I'm quite happy with the way this worked out. It looks like the shirt is too tight across my abdomen, but it's just my posterior being all too big again. I have plenty of ease above the hips. To address my rump in the final pattern, I'll add an inch or two to the bottom circumference. 

So what do yall think? Did I just totally waste a perfectly good 60/40 cotton-poly blend shirt? Any pointers on cutting it back apart to make a pattern? I've typed this 2nd part 4 times now because blogger keeps losing it (I guess they are experiencing technical difficulties here in the cloud...), so I'm all out of witty things to say. Leave me some love in the comments; Next time I think I'll take on ties!

Where I create a good fitting, but unwearable, shirt

Starting a new job bring with it many new and wondrous things. Chief among these, is the need to update one's wardrobe. One thing that I learned while hunting for new office-wear is that I have an awkwardly built body. OTR shirts that fit in the body will be bizarre in the neck/shoulder/sleeve EVERY DAMN TIME. Plus, now that I sew I am even more aware of these fit issues (which I was blissfully unaware of before). It was time to get my hands dirty.

As I mentioned in my Shirt Issue, I have several cheap and ill fitting shirts laying around in my closet. I decided it was time for my 'U.S. Polo Assn' shirt to find a new purpose in life, as a pattern base. The plan was to tailor the shirt until it fits great, then cut it apart and make a paper pattern from the pieces.

At this point, I think it's important to mention that I'm very much aware that I could just buy a shirt pattern, or even borrow one from Crissy (I'm sure she has at least 12). But that's not the way we do things around here. It's got to be the most difficult, drawn out, learning intensive route every time.

This is what I started with:

There is enough room in there for two of me. The last time I addressed this problem I used a modified 'pinch-and-pin' method to remove almost 8" of material from the body circumference. However, that shirt had no pleats, and this one has a sizable box pleat to contend with. While I think it looks stupid, I decided to just sew the pleat shut along the full length of the shirt.

Keeping things even was pretty simple since this shirt is a herringbone weave, so I had convenient guide-lines to follow. I went ahead and gave it a quick press to set the pleat. Once one side was pinned shut, I measured the width of the box pleat (1 1/2")

and then marked the width down the full length of the shirt. Again I used the shirt grain as a guide to make sure everything was even. I doubt it would have mattered if I was off a little here or there, so don't stress out if you're doing this on broadcloth.


And then carefully fold the shirt in half so that the two pleat edges are even. Leave the first side pinned shut during this. The goal is to have the outer pleat edges (the edges that face the side seams) touching.


As you can see here, after a good press, the pleat is folded over on itself. If we sew along the bottom edge of the pleat/fold the resulting stitch line will hold the pleat shut (making it into a functionless style piece). It will also be totally invisible since the pleat itself will cover it. 


My stitch line. The pins here are just holding the fold shut while I sew. Remove them and press the pleat open. At this point we've removed 3" of material from the circumference of the body, let's check the fit.


You can see how much of a difference a little volume reduction can make, but it's still is too blousey for my tastes. Since the back is now stable, I feel safe taking some more material out from the side seams. For this I decided to remove 1" from each side at my waist, tapering to a 1/2" reduction at the armpit and shirt bottom. Here was the result:

Looking good! I'd wear this to work now. Except that I can now clearly see creasing by my arms. Creasing that tells me the shirt is too large across the shoulders. It's like this project is never ending. 

(Author's note. This project is kind of long. Longer than I expected. I'm making an executive decision and splitting it into 2 parts for ease of browsing. Kyle Ruins a Shirt Part II)

Wednesday, April 11, 2012

Well, that took longer than expected

So it's been a while since I posted anything. It's not that I've had nothing to blog about--quite the opposite actually. I've just not had the time to spend here on the interwebs. I still love you all, I've just not been able to show it. The good news is, I'm back.

Last month, in what is no doubt a precursor to future events, the twins decided to play with Mommy's sciatic nerve. They did not play nice. The end result was a very long week of totally immobile wife. I'll spare you the gritty details, but suffice to say I had to help her with everything. EVERYTHING.

I still managed to get the garden in and keep it happy. We've gotten some rain this year, and that's helped quite a bit. It's almost time to start trellising the squash and cucumbers:


During all of this, I also began a new job; my first real 'Grownup' job. As of April 2nd, I am the new Grant Coordinator for Child Advocates of San Antonio. I don't typically like to mix business with pleasure (that's a total lie) but I'm going to take a moment to say that if you ever wanted a wonderful cause to support, the CASA programs (there's likely one near you) are about as good as they come. Essentially they provide a single neutral party to watch over children who have entered State Child Welfare programs (due to abuse or neglect) and ensure that the children receive the medical, social, psychological, and just plain human contact that they deserve. Check out the national CASA site for more details: http://www.casaforchildren.org/.

The good news about all of this: I had to buy some new clothes. And, of course, nothing fits me well off the rack. So back to the sewing machine I go! I'm mid-way though my attempt to make a "Perfect Fitting Shirt" (which I intend to cut apart and turn into a pattern), and I have a self-drafted trouser pattern laying around here somewhere than needs proofing. Good thing I work a regular 9-5 now (with no weekends), I'll finally have time to finish this stuff.

Tune in next time (I promise it will be soon, I'm already 80% finished) when I face off with this shirt:

Until then, feel free to share horror stories about being pregnant. I have nothing to work with, seeing as how I'm short on necessary equipment, and my wife is getting tired of getting blind-sided by all the-things-they-don't-tell-you-about-being-pregnant. Show us some love ladies, and gents I'm always open to tips on how to deal with these crazy hormones. 

Saturday, February 18, 2012

The Shirt issue

The third week of February is almost always total chaos for me. First I get hit with Valentine's Day and then immediately afterwards it's my wife's birthday and the requisite dinners and parties that both involve. Needless to say, it's tough to get things done. And that's been a recent problem for me: I have so much that needs to get done, that I spend all my time trying to figure out what comes next, and then I get nothing accomplished. This has become such a problem that I now literally have a closet full of "to do's".
The guitar I need to sell, wine that needs to be racked/bottled, a huge wad of shirts that need tailoring, and all the thrift store jackets that need some degree of messing with. This post is my first step at decluttering. It's time to tailor some shirts and get some color into rotation. But while I'm at it, lets take a look at the shirts construction and detailing. Surely there is something to be learned from that pile of cotton (and occasional ploy blend).

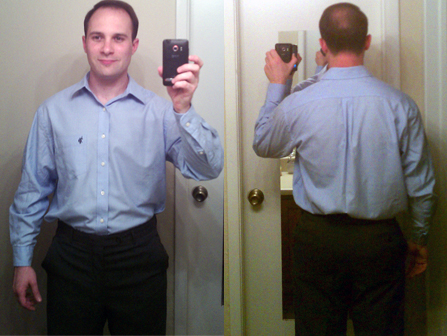
I like when my shirts fit like this John Henry 'Modern Fit' shirt. Not constrictive, but far from boaty. Unfortunately, if I want this fit off the rack, I have to make sacrifices. Typically it means I can't button the collar (as is the case here), because 15.5" collars only belong to guys with lots of extra girth (apparently). If I want to wear a tie, the body will fit like this Calvin Klein shirt:
And that's with most of the excess pulled to the back.

All of the shirts in that pile have something fit-wise that annoys me. Most need to have the bodies trimmed down. Some need collars reshaped, others need sleeves shortened or have shoulders that are ever so slightly too wide. Now that I've tasted from the table of well fitted garments, I want front arm scythes that start exactly at the arm/shoulder line. I want sleeves and cuffs that don't engulf my hands or wrists. I want collars that accent my face shape.

So lets take a look at a few of these to-do's.  The Calvin Klein from above, that needs the body narrowed, the sleeves shortened, and the shoulders cut down (ever so slightly). A blue Ralph Lauren Polo-line that is massively baggy on me, a Red Level Nine that fits well, but has a ridiculously large collar/stand. And one of three Van Heusen shirts that are in need of some serious slimming. I'm also going to take a look at the John Henry (also above) and a Ben Sherman that I'll have to stop wearing if I keep going to the gym.

First up, lets talk buttons:
Notice something about these two?
They have vertical button holes all the way down. The Van Heusens do this as well. I only recently began to question this practice, after noticing that the John Henry shirt was different:
A horizontal final button hole. I did a bit of googling, and learned that the reason this is done is to prevent the shirt from shifting, ever so lightly, and disrupting the horizontal lines of the patterning during wear. When the top and bottom buttons are fastened (these are the only two horizontal holes) the shirt is locked into position. The remaining holes are vertical to make button fastening easier. I wasn't sure how true that all was until I compared the patterns of the Calvin Klein to the Ben Sherman:

Ben Sherman uses a pearl snap for his final buttons, which achieves the same effect. Look closely at how exactly the pattern continues on the Sherman and how sloppy by comparison the CK shirt is. I doubt that I'll try to improve the stability of the CK shirt, although I could do so by adding an additional button hole. I will however, make sure that all shirts I make incorporate either Shermanesque snaps or horizontal lower holes.

Next up, lets examine sleeve cuffs:
Not a lot of surprises here. Par for the course is two buttons at the wrist and a gusset with an extra button to secure it. Notable exceptions are the Van Heusen shirt, which doesn't include the gusset button, and the Red Level Nine shirt which only has one sleeve size and uses two buttons for the closure. After staring at the cuff shapes for a while, I dislike the hard lines of the CK square cut cuffs and also the overly soft rounded edges on the Polo and Van Heusen shirts. It is wort noting that the cuff shape does not seem to bear any relationship to the collar shaping.

Speaking of collars:
This is an area that I've come to be pretty particular about. Notice that the CK and Polo shirts have metal collar stays inserted, and that the other shirts have permanently installed soft plastic stays. I hate soft plastic stays. They always melt/distort/break/move and then leave you with an oddly shaped unwieldy collar. I will never make nor buy a shirt without collar stay sleeves. I just cannot abide it. And on the topic of things that annoy me in the collar department, look at the beefy number that got put on the Red Level Nine shirt:
I just don't have enough neck to wear this beast. Also, the double buttons on the collar stay are a serious nightmare to fasten/unfasten. It's a real shame because the collar is the only thing keeping me from wearing this shirt. Future plans involve cutting almost half-an-inch off the collar and halving the collar stand (this sounds easy enough).

So what have I learned from all this?
Van Heusen shirts are utter crap. I got exactly what I paid for out of those <$10 sale shirts. Lots of cut corners, cotton/poly-blends, and poor factory fits. I'll not be buying any more of these, no matter how low the sale price may drop.

Calvin Klein and RL Polo shirts are better in quality, are 100% cotton, but still cut a few corners. Factory fit was not great either.

The Red Level 9 shirt has some questionable design decisions, the same poly-blend as the Van Heusen shirts, and no collar stays. However it does fit me pretty spot-on through the body, aside from the massive collar assembly which eclipses my entire neck. I doubt that I'd ever buy this brand in the future(I got this one as a gift).

John Henry shirts fit me decently when I get them one size too small. This one was another gift, so I don't know how a medium would have looked. Based on the detailing the quality seems higher than the other inexpensive shirts; I would consider possibly buying more in the future.

Ben Sherman seems to offer the best detailing, build quality, and fit for my body. The one shirt also cost as much as all the others combined. That said, it gets worn all the time while the other shirts toil in the 'to-do' pile.

Based on all this, I plan to knock out the RL9 collar assembly first. After that I'll slim down the maroon Van Heusen, and then begin recrafting of the Calvin Klein shirt. If, along the way, I ruin anything no tears will be shed. The goal is to do one shirt a week until the pile is gone. After that, it will be time for me to apply what I've learned and make a shirt from scratch. Stay tuned for updates!

Friday, February 10, 2012

It must be spring (because excuses are popping up like weeds)

Hello fellow citizens of Blogistan. I come to you today with sad news: I still haven't gotten any sewing accomplished. But it's not my fault, how can anyone be expected to sew under these conditions?
I can hear your thoughts now, "That poor machine, all tucked away unloved and unused under a crappy card table. And what's with that tiny meth lab in the bottom left corner?" Fear not, I would never cook meth, and especially not in my future twin's soon-to-be-nursery. That's just my make-shift seedling incubator.
Look at all those future tomatoes, bell peppers, ground cherries, strawberry and malabar spinaches, and (hopefully) strawberries! And this doesn't include the cucumbers, melons, squash, and various other peppers that will be going in outside (in a couple of weeks). As you can see I've kept a bit on the busy side with all this planting and growing.

What's that? Oh, yes, I know that growing is pretty much fire and forget. Once those seeds were planted I only have to throw twos of minuets per day at watering. Where then has all my time gone? I'm glad you asked:
Sexy bamboo trellises
I've been spending my nights cutting bamboo (from a source who I doubt will miss it) and my days trying to assemble these things. I need 6 in total, and they have to be strong because they'll be holding lots of fruit/vegetables. For interested parties, the total garden area is somewhere between 250 and 300 sq/ft, depending on how much I squeeze the rose bushes and trumpeter vine. The plan is to lay things out roughly like this:
This will probably change a little, but it's what I'm working from at the moment. Watering will be accomplished with a home-made soaker hose which will be laid under my mulch layer (for less waste). Speaking of watering-- I have to say that the Arbor Apartments in Boerne are Awesome. Last year my closest water hookup was 180' feet away. This year, the maintenance man reinstalled an old faucet that is only 50' away. How cool is that? He's totally getting extra watermelons this year.

I also plan to practice being a father, get the neighborhood kids interested in gardening, and safeguard the garden site all in fell swoop. I'm going to make a bunch of garden gnomes out of air-dry clay, then invite the local kids to paint them for me. I'm no sculptor, so their 5 and 6 year old painting skills will be the key to success here:
My first attempt at Gnomage
So as you can see, I've had a lot on my plate. Along with this, I've moved to working full time at work, started going back to the gym 3 times a week, and I'm making another attempt at becoming a runner (couch to 5k, anyone?) But I should be back to the needle soon. I printed a new pattern last night (for a new shirt) and I have a coworker who wants me to modify his shirt collar-- for MONEY!

Now all I have to do is avoid assassination from my enemies in the insect kingdom. No joke, I found this agent at work on my car tire today:
Sneaky bastard

Stay tuned for some actual sewing, more garden shenanigans, and more amazing things that you can squeeze into a single day if you don't watch T.V. Leave me some love, and remember to eat what you sow:

Wednesday, February 1, 2012

TheSewingGuru.com: reviewed!

Dear Blog,
I have been a bad blogger. I have been inconsistent and generally not given enough love to you or my readers. Can you ever forgive me? I promise to try harder from this point on.

Love n Kisses,
Kyle

Silliness aside, I have been a bit lacking in the regularly-updating department. Life's been pretty hectic between all the doctor visits, medical-research-whoring, and garden preparation. I haven't even gotten any sewing done. Not a single stitch; I feel like a total bum. Not at all like The Sewing Guru, who clearly has his act together.
The sewing guru

As I have mentioned before, I'm still pretty new to this whole sewing thing. What I do know is a combination of judicious googling, a few crash-course phone calls to Crissy, and lots of dismantled garments. Which is why I wish I'd found the sewing guru's site much sooner. To be blunt, it rocks.

I am a visual learner so the site's This Old House style videos are a major asset. Plus he does so much more than follow a simple pattern; he explains why each step is necessary. There's a course on basically every form of men's garment, and most women's basics too (Dress, skirt, jacket, trousers, blouse). He's also got lots of videos on sewing basics and machine maintenance.

My only real complaint is that he doesn't offer alternative routes for the home sewer who lacks professional equipment. An example of this is that he instructs viewers to overlock all edges. He fails to mention that if you are a hobbyist, and don't own an overlock machine, you can still pink your edges or use a bias tape. I think this oversight comes from the main strength of the series: The author appears to be a professional tailor.

He has several videos posted on YouTube, but he also offers a 2-day tree trial on his site, TheSewingGuru.com. I think that a beginning sewer could definitely do a lot worse than to drop $17/month to learn from a pro. It blew my mind that a trouser waist band had 6 pieces (plus another 4 of interfacing). The Simplicity pattern I have laying around here only calls for a single piece to be folded over!

So that's about it this time. Have any of you found any resources that you consider to be indispensable? Does having a visual reference make you want to take on a huge foolish project? I'm thinking that I need to make one more pair of trousers, 2 shirts, and then take on making a suit from scratch. Maybe February will be my month to shine (although, I think March is more likely).

Until next time,
Kyle

Tuesday, January 24, 2012

Tommy's new suit: Before and After

Back in November I decided that I'd tailor my great-uncle Wally's old suit and give it to my twin brother for Christmas. I went into this with basically no experience, a used $25 Dressmaker 101, and lots of stubborn resolve. The chronicles are recorded here: Concept, initial shaping, some revisions to the plan, finished the jacket shaping, and a brief bit about the trousers.

There was a bit of a delay getting photos of Tom in the suit, so I borrowed it back and took some of my own. Enough stalling, here are the before and after shots.

I started out with this:
And turned it into this:
and to address a few confused viewers, it is the same suit. I didn't dye it, that's just ambient lighting variation. No I didn't move the pocket, the before pics were taken in a mirror, the after shots were taken by my wife. :)

All in all, the work was fairly simple and was actually a bit of fun. The hardest part was picking a lapel shape that I liked. I struggled a little with the trousers, but that was mostly because I had never played with a pant pattern before and I had no idea how they went together. Total project cost, excluding my time (which is always free) is roughly this:

Sewing machine:        $25
Thread:                      $3
Fair value for the suit:  $10
---------------------------
                                 $65

Not bad really. I wish my suits from the store fit this well (I guess they will soon enough). So if you are a young professional looking for a first interview/work suit, or if you want to make an awesome gift for a man in your life, hit up a thrift store and dive in! I'll gladly answer any questions you have along the way.

What do you think? Is it worthwhile to recycle old suits? What are some pitfalls I may have missed or over looked? Leave me some love in the comments below.

I'll sign off tonight with a final side-by-side before/after:

Saturday, January 21, 2012

PM7 pant pattern: Round 2

In my last post I was trying to decide if Pattern Maker 7 was a worthwhile investment of my time. On one hand it offered the possibility of custom tailored patterns. On the other hand it contained incomplete pattern collections, absolutely no sewing instructions, and a high learning curve. In the end I wound up with skinny pants. But a quick redrafting (based upon the same measurements) yielded a totally different pattern, and some much more promising results. Check these out:
I can even sit down in these!
Not particularly form-fitting, but most men's pants aren't (or shouldn't be). I do wish they were a bit narrower below the knee, but that should be fairly easy to do.
And an ass shot, because I wanted to show off that the program actually makes a pretty well fitting seat. I didn't add rear pockets because this was a test muslin and I didn't see the need to mess with such details.

So what are my final impressions? If you are looking for a way to bang out some men's basics (lets face it, that's all men have) and you want to draft the pieces quickly and easily, than Pattern Maker 7 is probably not for you. I found many places where the pattern drafted incorrectly (like the way that the pocket assemblies draft without a seam allowance, even though it shows one) or simply cut corners (like the lack of rear waist darts and the single piece fold-over waist band).

But if you are looking for a program that will design a pattern for those basics, and you are willing to then tune that pattern to get it where you want it (basically, just use it at a starting point for a self-draft) than the $400 + $30 (for the men's pattern pack) may be the perfect thing for you. However, I feel it worthwhile to mention that there are many other drafting programs out there for under $300... and they may offer complete mens collections.

That's about all I have for tonight. It's been a long week here, but I've got some cool stuff for yall on the horizon, including photos of the finished Christmas suit (I borrowed it from Tom and had my wife snap a few shots) and a review of TheSewingGuru.com's tutorial series. Stay tuned!

Thursday, January 12, 2012

Well that didn't work...

When we last left off, I had decided to try and create a pair of pants using a CAD made pattern. The results were, well, less than spectacular:
Where, oh where did I leave my Desert boots and fixed gear bicycle? As you can see, the pants were mostly a failure. PM7 asks for your exact measurements and says it will add ease for you. I generally like more ease than this:
That is seriously the full range of motion I have for each leg. I will say that the calf-fit wasn't bad, but at the same time, the thighs fit like tights. The heavy taper accentuates the oddness of my leg build and makes me look like a weird androgynous hipster.
But surely the program was only doing what I told it to do right? Perhaps it arises from some metric/imperial conversion error. It has been known to happen, even to the best of us. So I reentered everything (in centimeters this time) and got a very different pattern. Was the difference because I used a measurement file this time versus manual entry? Was it metric/imperial madness? Who cares. Check the difference:
I think my thighs will fit in these pants! I also attached the infamous unknown part to the pant-front to create a zipper shield. The women's pattern did not generate the weirdo, but did create a flap (attached). Also the instructions (which are still pretty vague) have this picture:
Perhaps the men's pattern is not fully debugged? After a long day here are my impressions of PM7 thus far:

The men's patterns seem a bit rough. The women's patterns (aside from being much more plentiful) seem like they would produce solid garments. The men's patterns seem like they will need work. The zipper shield is either missing or oddly detached, there are no darts for the rear waist (I expected that there would be; the women's pants include them-- so have every pair of pants I've ever owned), and the fit this time around was not very good.

The program its self is a little raw too. The documentation is sparse and very technical. The interfaces are not very intuitive. I feel like I could love it (and I really want to) one day. But first I'm going to have to commit a lot of time that I just don't have. Have any of you ever used PM7? Did you just make stuff from the women's collection or did the menswear work out fine for you too?

Next time I'll post up the new pair, and maybe a little love for the garden too. I found a patch of bamboo growing wild, and there are 6 trellises that need building. Stay tuned: