Just look at those beauties. Actually, do look at them-- it's two examples of well fitting trouser seats. Notice that there's no bunching or pulling nor is there any excess material. This is what I wanted from Wally's old trousers, and here is what I started with:
Hey! Not bad at all. I guess this project was a breeze and there is absolutely no reason for the lack of progress updates. Well, that would be true, except that this photo is rigged; I am, in fact, cheating.
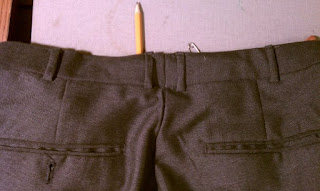
Awkward posture aside, that's a whole lot of material that needs to come out from the waist band. A whole lot of material:
Taking a pair of trousers in 2 inches is pretty simple. 4 inches means that a fair amount of reworking will be necessary. Plus, I have a confession to make: The last pair of trousers I attempted to "fix" are currently occupying space under my bed, in many pieces, and assembled in a way that my wife would call "Ruined". I really hope that I learned something last time...
Here's what I planned to do: First, take the pants in exactly as I would under normal circumstances. Second, re-work the seat seam to fix the inevitable mess that will be created. Third, narrow the legs down to be less blousey. Finally, hem the length for (hopefully) close to a half brake, and also conceal the damaged section at the bottom of the trouser leg. Alright, enough gum flapping, lets get to work!
The first step is to remove everything that is holding the rear seam together:
The more material needs to come out from the waist, the further down the rear seam things have to open. Since I'm are approaching madness here, I went ahead and opened the seam all the way to the crotch joint:
Flip the waist band up and find the old stitch line. Mark the new width on both sides, mark a line (following the shape of the old line) that runs from your new waist band, down to the seam. Pin that bad-boy and give it a quick stitch:
Sweet. Pull your pins out and give things a test fit. Be sure you find all your pins you do not want to forget one and find it later during the test fit.
Well, that looks like crap. I could fit two more of my ass into the seat of these pants. This is a great example of what it looks like if you take too much out of the waist and not nearly enough out of the rear-crotch assembly. It looks fine from the side however:
I'm telling you, I have curves. Kiki calls it my "Christmas Ham". Too bad you can't really get a clear look at it because it's getting lost in these baggy pant legs. But one problem at a time here folks, lets fix that seat.
To be completely fair, I'd have to post up literally two days worth of photos similar to the one above, as I slowly moved more and more material into the seat-seam. In the end (pardon the pun) I was shocked at how much that seat came in. Just remember to use a strong stitch for that seat once you get it right. I unfortunately do not have a picture of the new crotch assembly (Tommy is supposed to send me one). I do, however, have a few cool shots of how to finish the waist/seat alteration:
When you put the seam back together, make sure that the fabric grain and belt loops are vertical. Otherwise you have to reopen the seam (as I had to) and straighten things out. If things are not squared out, the waist band will start to 'V' out and no longer be flat.
Run a quick stitch-in-the-ditch line down the joint between the trousers and the waist band. This will attach the waistband to the trousers. Flip the inner band down and tack it in place (by hand or by machine), then reattach your belt loops. It should wind up something similar to this:
I was able to press out all of the creases that are evident here at the top. I'd love to show off the final project (then entire suit) but Tommy has yet to send me pictures of it. You'd think that a guy with a fancy dSLR would be more than happy to send his poor old
What do you think, readers? How'd the pants come out? Any thoughts on how to motivate Tom to send me the pictures? Drop me some love in the comments.
(I want to apologize for the slightly lower quality images this go-around. I'm working from my laptop and GIMP =/= Photoshop.)


Just a quick author's note, I ended up in a rush to finish the project before Christmas, so I wasn't able to document all the remaining steps in the project. I'll post up another post later on slimming trouser legs and hemming the bottoms.
ReplyDeletesweet, sweet cans are a gift from the baker side of the family-- one that only you and i received.
ReplyDeleteteam craft baker for the win!
You can hem my bottoms any time.
ReplyDelete