Showing posts with label alterations. Show all posts

Friday, April 13, 2012

Where I create a good fitting, but unwearable, shirt (part II)

This post is part II in a series. To get caught up to speed, check out part I here.


Awww shit, look at that crease! Note how the yoke rolls down onto my arm. Clearly the shoulder fit to too big. Except, when I compared the shoulders of this shirt to my well fitting white shirt, the rear yokes measure exactly the same. So I measured the front yokes from collar to sleeve:


And found that the blue shirt was 2cm wider along the front yoke edge. I don't know why they drafted this odd of a arm scythe, but I was going to have to fix it. Time to remove the sleeves and recut the yokes.


It was at this point that I realized total sleeve removal was going to be a no-go. When adjusting the side seams I chose to half-ass things and sewed the arm hole bottoms shut. Since I didn't intend to wear this shirt out anywhere it wasn't a big deal to just half-remove the sleeves. If you are doing this invasive of a procedure on a shirt you want to wear, I'd bring in the sides last (or just do things right the first time).


I measured in 16mm (the front yoke size on taken from the white shirt) and marked my new yoke width.


and then drew my new arm scythe using the french curve that I've borrowed from Crissy (I'm giving it back soon, I promise). I'm a firm believe in over-using pins, and also of pin-basting, so this was the sleeve before I sewed it:


While I was working with the sleeve, I went ahead and removed a 2" wedge (from armpit to cuff) in an attempt to reduce bagginess in that area. I think I may have pinned poorly, because it gave the sleeve an odd wrinkle. This is was the fit afterwards:


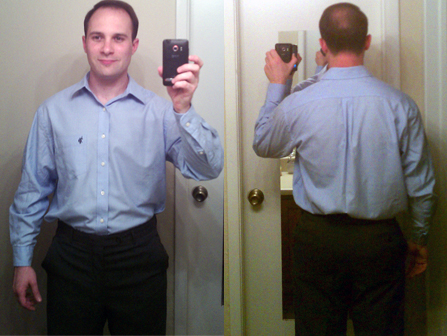
And an obligatory before:middle:after shot:


All in all I'm quite happy with the way this worked out. It looks like the shirt is too tight across my abdomen, but it's just my posterior being all too big again. I have plenty of ease above the hips. To address my rump in the final pattern, I'll add an inch or two to the bottom circumference. 

So what do yall think? Did I just totally waste a perfectly good 60/40 cotton-poly blend shirt? Any pointers on cutting it back apart to make a pattern? I've typed this 2nd part 4 times now because blogger keeps losing it (I guess they are experiencing technical difficulties here in the cloud...), so I'm all out of witty things to say. Leave me some love in the comments; Next time I think I'll take on ties!

Where I create a good fitting, but unwearable, shirt

Starting a new job bring with it many new and wondrous things. Chief among these, is the need to update one's wardrobe. One thing that I learned while hunting for new office-wear is that I have an awkwardly built body. OTR shirts that fit in the body will be bizarre in the neck/shoulder/sleeve EVERY DAMN TIME. Plus, now that I sew I am even more aware of these fit issues (which I was blissfully unaware of before). It was time to get my hands dirty.

As I mentioned in my Shirt Issue, I have several cheap and ill fitting shirts laying around in my closet. I decided it was time for my 'U.S. Polo Assn' shirt to find a new purpose in life, as a pattern base. The plan was to tailor the shirt until it fits great, then cut it apart and make a paper pattern from the pieces.

At this point, I think it's important to mention that I'm very much aware that I could just buy a shirt pattern, or even borrow one from Crissy (I'm sure she has at least 12). But that's not the way we do things around here. It's got to be the most difficult, drawn out, learning intensive route every time.

This is what I started with:

There is enough room in there for two of me. The last time I addressed this problem I used a modified 'pinch-and-pin' method to remove almost 8" of material from the body circumference. However, that shirt had no pleats, and this one has a sizable box pleat to contend with. While I think it looks stupid, I decided to just sew the pleat shut along the full length of the shirt.

Keeping things even was pretty simple since this shirt is a herringbone weave, so I had convenient guide-lines to follow. I went ahead and gave it a quick press to set the pleat. Once one side was pinned shut, I measured the width of the box pleat (1 1/2")

and then marked the width down the full length of the shirt. Again I used the shirt grain as a guide to make sure everything was even. I doubt it would have mattered if I was off a little here or there, so don't stress out if you're doing this on broadcloth.


And then carefully fold the shirt in half so that the two pleat edges are even. Leave the first side pinned shut during this. The goal is to have the outer pleat edges (the edges that face the side seams) touching.


As you can see here, after a good press, the pleat is folded over on itself. If we sew along the bottom edge of the pleat/fold the resulting stitch line will hold the pleat shut (making it into a functionless style piece). It will also be totally invisible since the pleat itself will cover it. 


My stitch line. The pins here are just holding the fold shut while I sew. Remove them and press the pleat open. At this point we've removed 3" of material from the circumference of the body, let's check the fit.


You can see how much of a difference a little volume reduction can make, but it's still is too blousey for my tastes. Since the back is now stable, I feel safe taking some more material out from the side seams. For this I decided to remove 1" from each side at my waist, tapering to a 1/2" reduction at the armpit and shirt bottom. Here was the result:

Looking good! I'd wear this to work now. Except that I can now clearly see creasing by my arms. Creasing that tells me the shirt is too large across the shoulders. It's like this project is never ending. 

(Author's note. This project is kind of long. Longer than I expected. I'm making an executive decision and splitting it into 2 parts for ease of browsing. Kyle Ruins a Shirt Part II)

Sunday, January 1, 2012

Lets talk (about my ass)

Well, that took longer than expected. Two weeks ago, I promised a plethora of ass shots and a discussion on trouser seats. Blogoshpere, I fully intend to deliver:
Just look at those beauties. Actually, do look at them-- it's two examples of well fitting trouser seats. Notice that there's no bunching or pulling nor is there any excess material. This is what I wanted from Wally's old trousers, and here is what I started with:
Hey! Not bad at all. I guess this project was a breeze and there is absolutely no reason for the lack of progress updates. Well, that would be true, except that this photo is rigged; I am, in fact, cheating.
Awkward posture aside, that's a whole lot of material that needs to come out from the waist band. A whole lot of material:
Taking a pair of trousers in 2 inches is pretty simple. 4 inches means that a fair amount of reworking will be necessary. Plus, I have a confession to make: The last pair of trousers I attempted to "fix" are currently occupying space under my bed, in many pieces, and assembled in a way that my wife would call "Ruined". I really hope that I learned something last time...

Here's what I planned to do: First, take the pants in exactly as I would under normal circumstances. Second, re-work the seat seam to fix the inevitable mess that will be created. Third, narrow the legs down to be less blousey. Finally, hem the length for (hopefully) close to a half brake, and also conceal the damaged section at the bottom of the trouser leg. Alright, enough gum flapping, lets get to work!

The first step is to remove everything that is holding the rear seam together:
The more material needs to come out from the waist, the further down the rear seam things have to open. Since I'm are approaching madness here, I went ahead and opened the seam all the way to the crotch joint:
Flip the waist band up and find the old stitch line. Mark the new width on both sides, mark a line (following the shape of the old line) that runs from your new waist band, down to the seam. Pin that bad-boy and give it a quick stitch:
Sweet. Pull your pins out and give things a test fit. Be sure you find all your pins you do not want to forget one and find it later during the test fit.
Well, that looks like crap. I could fit two more of my ass into the seat of these pants. This is a great example of what it looks like if you take too much out of the waist and not nearly enough out of the rear-crotch assembly. It looks fine from the side however:
I'm telling you, I have curves. Kiki calls it my "Christmas Ham". Too bad you can't really get a clear look at it because it's getting lost in these baggy pant legs. But one problem at a time here folks, lets fix that seat.
To be completely fair, I'd have to post up literally two days worth of photos similar to the one above, as I slowly moved more and more material into the seat-seam. In the end (pardon the pun) I was shocked at how much that seat came in. Just remember to use a strong stitch for that seat once you get it right. I unfortunately do not have a picture of the new crotch assembly (Tommy is supposed to send me one). I do, however, have a few cool shots of how to finish the waist/seat alteration:
When you put the seam back together, make sure that the fabric grain and belt loops are vertical. Otherwise you have to reopen the seam (as I had to) and straighten things out. If things are not squared out, the waist band will start to 'V' out and no longer be flat.
Run a quick stitch-in-the-ditch line down the joint between the trousers and the waist band. This will attach the waistband to the trousers. Flip the inner band down and tack it in place (by hand or by machine), then reattach your belt loops. It should wind up something similar to this:
I was able to press out all of the creases that are evident here at the top. I'd love to show off the final project (then entire suit) but Tommy has yet to send me pictures of it. You'd think that a guy with a fancy dSLR would be more than happy to send his poor old tailor brother a few jpgs, but as of now we'll all have to wait.

What do you think, readers? How'd the pants come out? Any thoughts on how to motivate Tom to send me the pictures? Drop me some love in the comments.

(I want to apologize for the slightly lower quality images this go-around. I'm working from my laptop and GIMP =/= Photoshop.)

Saturday, December 17, 2011

It finally fits: The finished jacket body

We we last left off, I was nearly finished remaking the lapels and collar of Tom's present. I'm making pretty good time and I think I'll have this done in time for Christmas. Then disaster struck: today Tom texted me and said that he'd just scored a used suit from a friend. Well shit, way to rain on my parade. Here is what he sent me:
Fortunately, the fit needs some tailoring and the lapels/styling are definitely dated (likely a similar vintage to the project suit). Unfortunately, the suit is a super cool brown/rust windowpane plaid and I'm more than a little jealous. In the end, this development changes nothing; he still needs a modern styled, well fitting suit. Back to the oars collar with me.

Reshaping the collar is basically the same as the lapels. Mark off the shape you want, open the stitches, fold, press, trim, restitch. It's a smaller piece, only one layer thick, and therefore much faster going. After the shape is good, pin, trim, and restitch the felt backing.
After it's all assembled, give everything a good press and marvel in your work. But not too long, because half the suit still needs work, and now things get tricky. The second half needs to match the first half perfectly. At first, I intended to make a cardboard pattern that would let me transfer the exact shape across:
The first step was to find a stable reference point that was equal on both sides. I chose the first body dart and the lapel's notch. Then pinned the cardboard in place to prevent it from moving. Next I flipped the assembly over and traced the lapel edge.
This strategy however, has a flaw: the new side has a different notch than the unaltered side. In order to keep things symmetrical I was going to need lots of careful measuring... something I really lack the patience for. Time for plan 'B'.

This jacket's lining is edged in with a thin red ribbon. It adds a nice bit of stying, but it also provides a fixed reference point for both jacket sides. I decided to match the ribbon lines up, pin everything together, and trace the new lapel onto the old one.
It worked great. If it hadn't, I'd still have been able to do lots of tedious measuring and get the same result (thank God I didn't have to). From here out, the process is exactly the same as before: Rip the seams, fold, press, double check that it looks right, baste, trim, and top-stitch. It really does go faster once you are not trying to figure out what shape you like or anything else of that sort. The end result was, in my humble opinion, awesome.
Lets take a closer look at how those lapels turned out, and why I chose the shape I did.
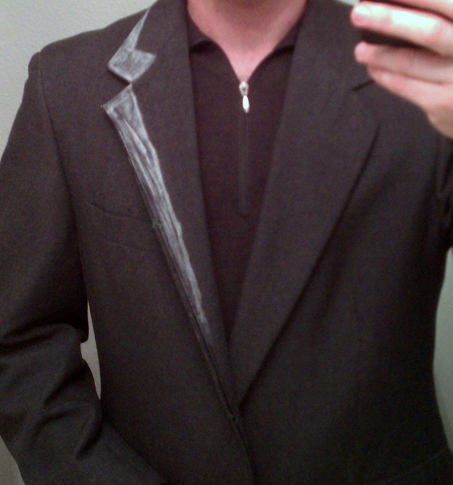
In the end, I decided that the lapel edge should be parallel to the torso edge (green lines), that the top notch edge should be parallel to the pocket (red lines), and that the lower notch edge should be parallel to the shoulder (blue lines). That one was a miss, but only because I can't change the angle of the original geometry. It's possible that all that would create a notch that is too shallow, but until I find a suit with sufficient geometry to play with, I'll never know.

Still to come: shortening (and possible narrowing) of the sleeves, hemming of the pants, and I need to find a way to cut almost four inches out of the waist! Given that time is running short, I think the next step should be the pants. I already know how to shorten the sleeves and hem the pant legs, but that waist is going to take some creative thinking to prevent it from looking like crap. Stay tuned for gratuitous shots of my ass, because next time we take on the trousers!
Wednesday, December 14, 2011

Two steps forward, one step back.

So I stared at the progress I had made in the last update and decided I didn't like the new lapel. Something, and I'm still not 100% sure what, was off. So it was back to the drawing board, seam ripper, pin box, and iron. This jacket is going to be perfect even if it kills me. I busted out my chalk and drew up the new shape:
The goal here was to try and get the lapel edge to be roughly parallel with the side of the torso. If possible, I'd also like to make the notch/collar edge parallel to the shoulder. However, the original suit pattern prohibits this. I was satisfied with the chalk-up and so I ripped the lapel back apart. This time I remembered to baste EVERYTHING. Both sides independently and then again together. I even threw in some pins for the hell of it.
 I also decided that using black thread was not going to cut it for this project. Since I was redoing all my previous stitches, it was the perfect time to make such a decision. I think it was the right call:
Alas, this project is beginning to show me that my $25 thrift-store Dressmaker 101 is on the way out. The lower thread tension is not adjustable (that I can find) and just look at this mess. Every time I start a new stitch now, I have to deal with this:
Fortunately, I love both seam ripping and knot tying. After a few minutes of dewadding I was ready to pull out the basting stitches. The to removal of basting is to NOT tie knots when you stitch those in. That way they slide out nice and easy.
And that's it! The side and lapel are a nice press and a couple of button holes away from completion. We're 25% of the way to the finish line. Time to take on the collar and lapel notch. To make the notch I had to separate the collar from the lapel. Not all the way, but a bit farther than what was chalked in (for ease of work). To make life easy on myself, I removed the felt collar backing:
This collar is different than the ones I've played with in the past. It's a total short-cut, but one I'm likely to employ in the future. The collar edge is folded over the felt and then overcasted back onto the felt. Only the edge, not the full length. The upshot is that it makes it much easier to keep the end looking clean and even. Note that the back edge is also zig-zagged to the felt backing. I will definitely NOT put it back on that way.
Time was getting short so I decided to mock up the fit and see how it all looked. Out came the pins and requisite facebook mirror self-shot:
I'm so tired excited here that I forgot to smile.Once this is done I'm totally going to have to tailor myself a suit so that Tom doesn't end up dressing better than me all the time.  I think it's damn good. Still not perfect, but damn good. What do you think, readers? Would you change anything about the lapel shape?

Next time I'll finish the collar, make a cardboard stencil and start in on the other side. See you then.

Sunday, December 11, 2011

Too wet to climb, but progress is made (sort of)!

Over a month ago, my climbing buddies and I decided to get together and climb some super-secret sport and top-rope routes (near Boerne) and maybe partake of some sweet bouldering action while we were at it. But Mother Nature had other plans. With as dry as things have been, I feel like a jack-ass for complaining about rain, but goddamnitiwantedtoclimb! Oh well, I'll have lots of chances once my kid is born, right?

So instead I stayed in and accomplished some work on my Christmas project: Tommy's suit. When last we left off I was still in the planning phase of what to do. Today I started cutting. But before I did that, I did some measurements and comparisons. First up, I compared the project jacket to two others, paying attention to the lapel shapes.
Note the more exaggerated curvature the bottom (project) jacket has. The houndstooth, after its recent rework, is very straight, and the middle jacket is apparently a long cut? Who cares. Its time to measure our new edge. I don't have lots of fancy sewing tools, but I do have a level, and hey, it's good enough right?
Hit it with the chalk wheel, and we get this:
Nice. This is a good time to decide if you want a different (read: narrower) lapel shape. I decided to stay, relatively, stock with this. Next up, it's time to press the new edge. The chalk line will work as our new guide line for pressing.
I have my press cloth crammed in there for definition and to show how much material is being removed. After both sides were pressed, I basted the new edges with high contrast green thread. The idea here is to keep things from moving while we are sewing the edges together. I've tried pins, but they never work quite as well. It doesn't take long, and saves a good deal of grief down the road.
After that, I pinned the two halves together and got to sewing. The results were not spectacular, because I ignored my own advice and didn't baste the two halves together before sewing. Instead, I pinned it and there was a little bit of shift. Nothing I can't fix later, but it was there. Baste the sides, don't pin them. And here is the rough-up of what it will look like:
However, I'm not totally happy with the end result on the lapel. I think it's... off some how. Perhaps it needs to be narrowed and the notch needs to be higher. Perhaps something like this:
I'll play with it more in the morning. I have to get up early and my baby-momma is yelling at me to call it a night. Give me some love and/or feedback. I'll toss up more tomorrow.